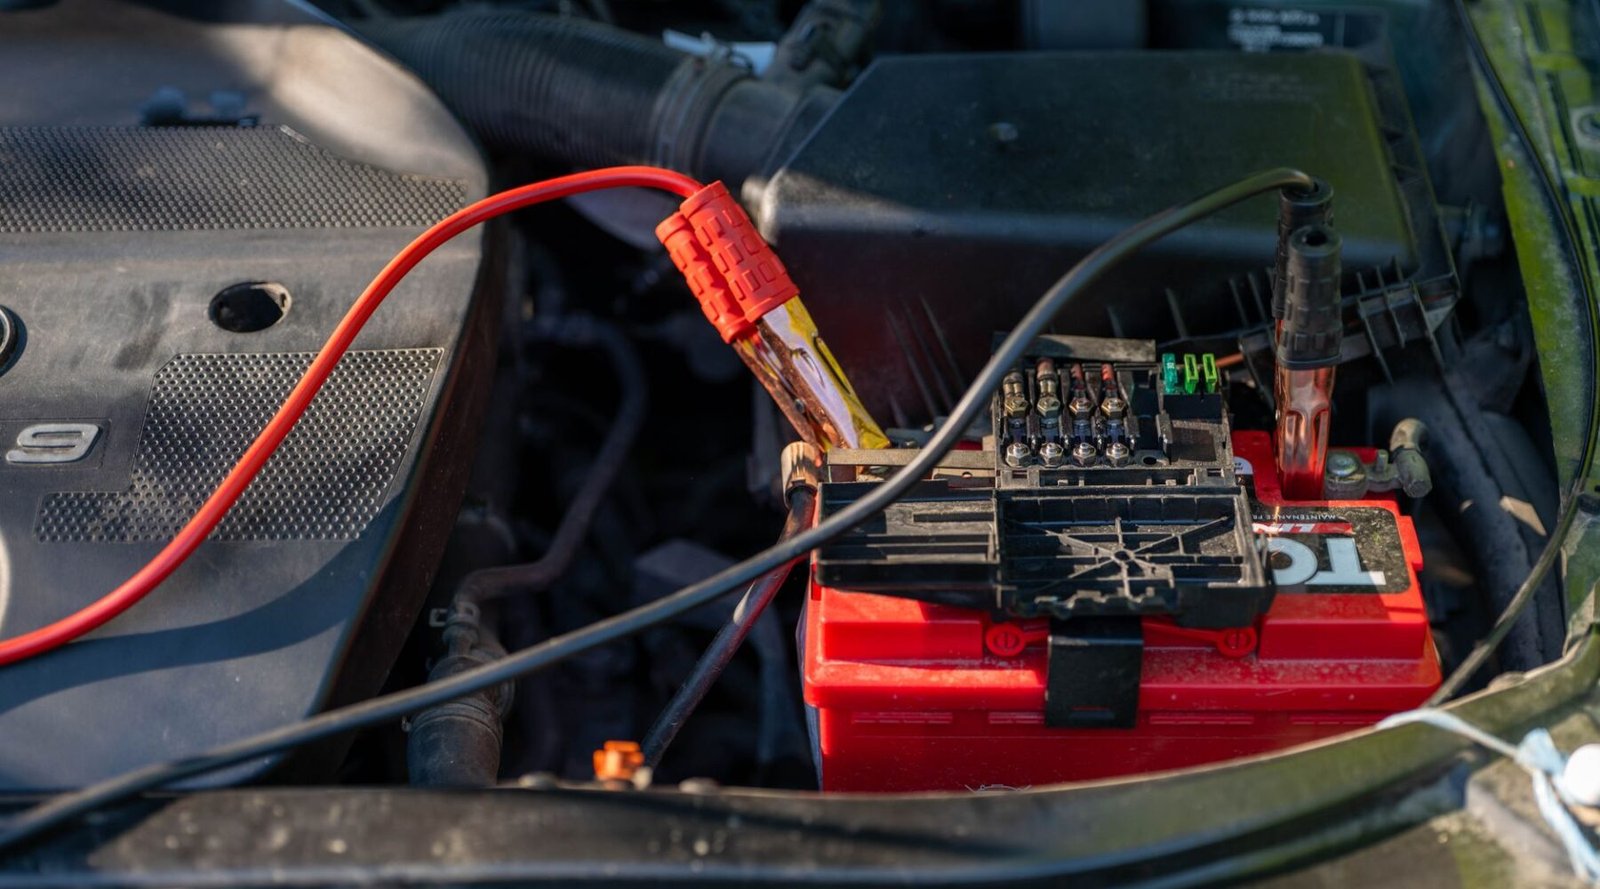
Knowing how to jump-start a car safely is an invaluable skill for any driver. A dead battery can happen to anyone, often at the most inconvenient times. Whether you are in a parking lot or at home, understanding the jump-starting process can save you from being stranded.
Understanding the basics of jump-starting
Before diving into the step-by-step procedure, it’s crucial to understand the components involved in jump-starting a car. A jump start typically involves two vehicles: a functioning one with a charged battery and the one that needs help. The process relies on transferring electrical energy from the good battery to the dead one to initiate the engine.
Essential tools for jump-starting
The primary tool you will need is a set of jumper cables. These cables usually come in a bright color, often red and black, to indicate the positive and negative connections. It’s advisable to use cables that are at least four to six gauge for optimal conductivity. Additionally, having safety gloves and goggles can provide extra protection while working with batteries.
Step-by-step guide to jump-starting a car
Follow these steps to jump-start a car safely:
- Position the vehicles: Park the functioning vehicle close to the one with the dead battery, ensuring they don’t touch. Turn off both vehicles and engage the parking brakes.
- Identify battery terminals: Locate the batteries in both vehicles. Identify the positive terminal, usually marked with a plus sign (+), and the negative terminal, marked with a minus sign (-).
- Connect the jumper cables: Start with the red cable. Connect one end to the positive terminal of the dead battery. Then, connect the other end to the positive terminal of the good battery. Next, take the black cable and connect it to the negative terminal of the good battery. Finally, attach the other end of the black cable to an unpainted metal surface on the dead vehicle, away from the battery. This helps prevent sparks near the battery.
- Start the functioning vehicle: Start the engine of the vehicle with the good battery and let it run for a few minutes. This allows the dead battery to gain some charge.
- Start the dead vehicle: Attempt to start the vehicle with the dead battery. If it doesn’t start immediately, wait a few more minutes and try again. If it still fails to start after several attempts, the issue may be more than just a dead battery.
- Disconnect the cables: Once the dead vehicle starts, carefully remove the jumper cables in the reverse order of connection: start with the black cable from the unpainted metal surface, then the black cable from the good battery, followed by the red cable from the good battery, and finally the red cable from the previously dead battery.
- Let the vehicle run: Keep the revived vehicle running for at least 20 minutes to allow the alternator to recharge the battery.
Safety precautions to consider
While jump-starting a car can be straightforward, safety must always come first. Here are key precautions to take:
- Check battery condition: Before jump-starting, inspect both batteries for any visible damage, leaks, or corrosion. If you notice any of these issues, do not proceed.
- Avoid contact: Ensure that the two vehicles do not touch during the process, as this can create a short circuit.
- Use appropriate gear: Wear safety goggles and gloves to protect yourself from any accidental battery acid spills or sparks.
- Be cautious with flammable materials: Avoid jump-starting near flammable materials or in poorly ventilated areas.
When to call for professional help
Sometimes a jump-start is not enough to revive your vehicle. If the car does not start after several attempts or if you notice other issues such as strange noises, smoke, or warning lights on the dashboard, it is best to contact a professional mechanic. Additionally, if you find yourself frequently needing a jump start, it may be time to consider replacing your battery or having your electrical system checked.
In conclusion, knowing how to jump-start a car safely is a crucial skill that can empower drivers in times of need. By following the proper steps and adhering to safety precautions, you can effectively revive a dead battery and get back on the road with confidence.
Understanding jump-starting equipment and techniques
While many drivers are familiar with the basic process of jump-starting a car, understanding the various types of jump-starting equipment and techniques can significantly enhance safety and efficiency. This section delves into the nuances of different jump-start methods, the equipment required, and best practices to ensure you can handle the situation effectively.
First, let’s explore the two primary types of jump starters: traditional jumper cables and portable jump starters. Traditional jumper cables are typically 10 to 25 feet long, with heavy-gauge wires designed to conduct electricity efficiently. When choosing jumper cables, look for a gauge of 4 to 8 AWG, which indicates thicker wires that can handle higher currents without overheating. While most cables come with color-coded clamps—red for positive and black for negative—ensure that the cables are in good condition, free from frays or corrosion.
In contrast, portable jump starters have become increasingly popular due to their convenience and safety features. These devices are compact battery packs that can jump-start a vehicle without needing another car. Many models include built-in safety mechanisms such as reverse polarity protection, which prevents damage if the clamps are connected incorrectly. When selecting a portable jump starter, consider its peak amp rating; a unit with at least 400 amps is generally sufficient for most passenger vehicles. Some jump starters also come with added features like USB ports for charging devices, air compressors, and built-in flashlights, making them versatile tools for emergencies.
Next, understanding the correct technique for jump-starting a vehicle can mitigate risks. Here’s a detailed step-by-step approach to ensure safe and effective jump-starting:
1. **Position the vehicles**: Park the donor vehicle close to the dead vehicle, ensuring the two cars do not touch. Turn off both vehicles and engage parking brakes.
2. **Connect the jumper cables**: Attach the red clamp to the positive terminal of the dead battery first, followed by the red clamp to the positive terminal of the donor battery. Then connect the black clamp to the negative terminal of the donor battery. Finally, the last black clamp should be attached to an unpainted metal surface on the dead vehicle, away from the battery. This step reduces the risk of sparks near the battery.
3. **Start the donor vehicle**: With the cables securely connected, start the donor vehicle and let it run for a few minutes to charge the dead battery.
4. **Start the dead vehicle**: After a few minutes, attempt to start the dead vehicle. If it doesn’t start, wait a few more minutes before trying again.
5. **Remove the cables**: Once the dead vehicle starts, carefully disconnect the cables in the reverse order: black clamp from the unpainted metal, black clamp from the donor battery, red clamp from the donor battery, and finally the red clamp from the dead battery.
Lastly, it’s crucial to be aware of the battery types in modern vehicles. Many newer cars feature AGM (Absorbent Glass Mat) batteries or lithium-ion batteries, which can be more sensitive to jump-starting methods. Follow the manufacturer’s guidelines to avoid damaging these advanced battery types. If you are unsure, consulting the owner’s manual can provide specific instructions tailored to your vehicle.
By understanding the equipment, applying proper techniques, and considering the battery type, you can jump-start a vehicle safely and efficiently. This knowledge not only enhances your confidence but also helps you assist others in need, making you a more prepared driver.
Understanding jump-starting techniques and safety tips
Jump-starting a car is often straightforward, but it can become complicated if you encounter unexpected issues. Knowing how to handle these situations effectively ensures both safety and success. Here, we delve into advanced techniques and safety precautions that can elevate your jump-starting skills.
Before proceeding, it’s crucial to understand the condition of both vehicles involved. If the battery in the car providing the jump is weak or faulty, it may not deliver sufficient power to start the dead battery. Always ensure that the assisting vehicle is in good condition, with a fully charged battery, and that it is the same voltage (typically 12V for most cars). If either battery is swollen, leaking, or visibly damaged, do not attempt to jump-start the vehicle. Instead, seek professional assistance.
In case the car does not start after a jump, there may be other underlying issues such as a faulty ignition switch or a blown fuse. Before proceeding to troubleshoot, allow the dead battery to charge for a few minutes after connecting the cables. Sometimes, leaving the donor vehicle running for a short period can help transfer enough charge to kickstart the process.
“In a pinch, if you suspect that the battery is entirely dead, you can also consider push-starting a manual transmission vehicle. This involves pushing the car to gain momentum, then engaging the clutch while shifting into second gear and releasing the clutch quickly.”
Another advanced safety tip involves cable management. Ensure that the cables do not dangle near moving parts of either engine, as this can lead to fraying or accidental disconnection. If you are using a jumper pack instead of another vehicle, make sure to read the instructions provided by the manufacturer since various models have different operating procedures.
Additionally, consider the environment where you are jump-starting. Avoid doing this in enclosed spaces or areas with poor ventilation, as gases from the battery can be harmful. If you must jump-start in a garage, ensure that the doors are open and that there is adequate airflow.
After a successful jump, run the vehicle for at least 20 to 30 minutes to allow the alternator to recharge the battery fully. During this time, avoid using electrical components such as air conditioning or radios, as these can drain the battery. If the vehicle repeatedly requires jump-starting, it may be wise to have the battery and the vehicle’s electrical system checked by a professional.
Finally, it’s advisable to invest in a quality set of jump leads or cables. Look for cables that are at least 16 feet long with a gauge of 4 AWG or thicker for optimal conductivity. Some cables come with built-in safety features, such as fuses or LED indicators, that can provide additional safety and ease of use.
By understanding these advanced jump-starting techniques and safety tips, you can not only help yourself but also assist others effectively when they face unexpected battery issues. Preparedness and knowledge are your best tools in ensuring that you can respond confidently in any jump-starting situation.
Understanding the importance of battery care
Jump-starting a car is often seen as a straightforward task, but it is essential to understand the underlying principles of battery care to ensure the longevity of your vehicle’s battery and avoid future issues. A car battery typically lasts between three to five years, but several factors can influence its lifespan. Understanding these factors can significantly reduce the frequency of jump-starts.
One of the primary reasons for a dead battery is sulfation, which occurs when a lead-acid battery sits for extended periods without being charged. This process leads to the formation of lead sulfate crystals on the battery plates, which can hinder performance. To mitigate this, regular maintenance is crucial. If you know you won’t be using your vehicle for an extended period, consider investing in a smart battery maintainer or trickle charger. These devices keep the battery charged and prevent sulfation, ensuring your vehicle starts reliably.
“Regular maintenance is crucial for battery longevity.”
Another common issue is extreme weather. Batteries can struggle in both hot and cold conditions. High temperatures can accelerate battery fluid evaporation, while cold weather can reduce the battery’s ability to hold a charge. If your area experiences extreme temperatures, consider choosing a battery designed for such conditions. Look for batteries with high cold cranking amps (CCA) ratings for cold weather or those that can withstand high heat without damage.
Additionally, ensuring a clean battery terminal is vital. Corrosion can build up on the terminals, leading to poor connections and starting issues. Regularly inspect the battery for any signs of corrosion, which may appear as a white, ashy substance around the terminals. If you notice corrosion, it can be cleaned using a mixture of baking soda and water. Make sure to disconnect the battery cables before cleaning, starting with the negative terminal.
Proper connection of jump leads is also critical. While the initial focus is on how to jump-start a dead battery, understanding the battery’s health helps in the long run. Incorrectly connecting jump leads can lead to a short circuit, potentially damaging both vehicles. Always connect the positive (red) lead to the positive terminal of the dead battery first, followed by the positive lead on the donor battery. Connect the negative (black) lead to the donor battery’s negative terminal, then attach the other end to a clean, unpainted metal surface on the dead vehicle, such as the engine block. This minimizes the risk of sparks near the battery.
Lastly, after jump-starting the vehicle, it’s essential to drive it for at least 30 minutes to allow the alternator to recharge the battery fully. Simply letting the car idle may not provide sufficient charge, as the alternator requires a certain RPM to work effectively. If the battery continues to die after being jump-started, it may indicate a deeper issue, such as a failing alternator or a battery that has reached the end of its life. In this case, a professional diagnostic is advisable.
By understanding battery care and maintenance, you can not only improve your chances of a successful jump-start but also extend the lifespan of your battery, enhancing your vehicle’s reliability in the long run.
Related reading: Understanding real-world engine oil change intervals and service needs, and Essential car maintenance practices for long-term reliability. For an outside reference on this topic, see NHTSA's vehicle resources.


2 Responses